Troubleshooting
Any time you make changes to your system's audio settings, you also need to update VuDeck’s audio settings accordingly. Otherwise, your application may stop working.
You can always return to the setup to make the necessary changes.
On macOS, bringing VuDeck and your system’s audio settings into alignment can be confusing, especially if you’re not familiar with the inner workings of Mac Audio.
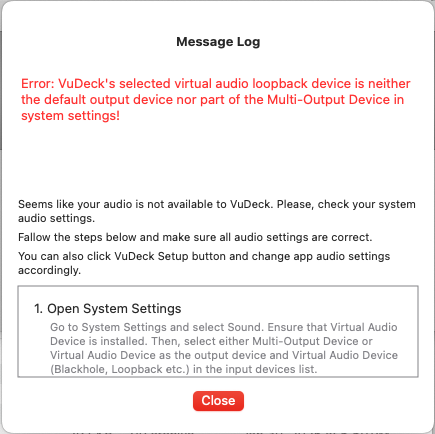
Whenever you make changes to your system’s audio settings, depending on VuDeck's current state, you may receive an error message if you run VuDeck after the system change, or a warning if VuDeck was still running at the time of the change. The nature of the error message can vary based on the device you’re using (e.g., third-party virtual audio loop-back device or VuDeck’s pass-through virtual audio device).

In the case of using a third-party virtual audio loop-back device like BlackHole or Rogue Amoeba Loopback, if you delete the device or change the input or output device in your system's settings, VuDeck will stop working.
If you switch to another loop-back device in your system settings, go to Settings → Audio Settings from the panel, or select Audio Settings directly from the top menu bar, and choose the new active device from the drop-down list.
Sometimes, when you make changes to your system's audio setup, VuDeck might not detect the change and may continue running until the next restart, or it could stop running immediately. Even after changing the device in VuDeck’s audio settings, VuDeck may still fail to detect the change. In this case, closing and restarting VuDeck may solve the issue.
If you're using a third-party virtual audio device, follow the steps below to fix your audio setup if needed. You can also refer to the website of the specific virtual audio loop-back device you're using for further assistance.
- Open System Settings -> Go to System Settings and select Sound. Ensure that Virtual Audio Device is installed. Then, select either Multi-Output Device or Virtual Audio Device as the output device and Virtual Audio Device (BlackHole, Rogue etc.) in the input devices list.
- Open Audio Midi Setup, you can use Spotlight command+space and type Audio Midi Setup, click on the Audio Midi Setup app to open it.
- Open Audio Devices Window, If the Audio Devices window doesn’t appear automatically, go to the Window menu in Audio MIDI Setup top toolbar and select Audio Devices.
- Create Multi-Output Device, In the lower-left corner of the Audio Devices window, click the + icon and choose Create Multi-Output Device.
- Select Output Devices, For the new Multi-Output Device, choose the audio devices you want to use for output audio. It's recommended to enable Drift Correction for all devices except the Clock Source.
- Set Audio Output to Multi-Output Device, Right-click the new Multi-Output Device and select Use This Device For Sound Output. Audio should now play through both your speakers and the Virtual Audio Device.
- Open Audio Settings in VuDeck Settings Window, Ensure that the same loop-back device you set in System Settings is also chosen as the Virtual Audio Loop-back Device in the Audio Settings window.
If the virtual audio loopback device is no longer available on your system, or if you need to switch to another aggregate device, follow the steps below and reset VuDeck to the app's process-based audio setup.
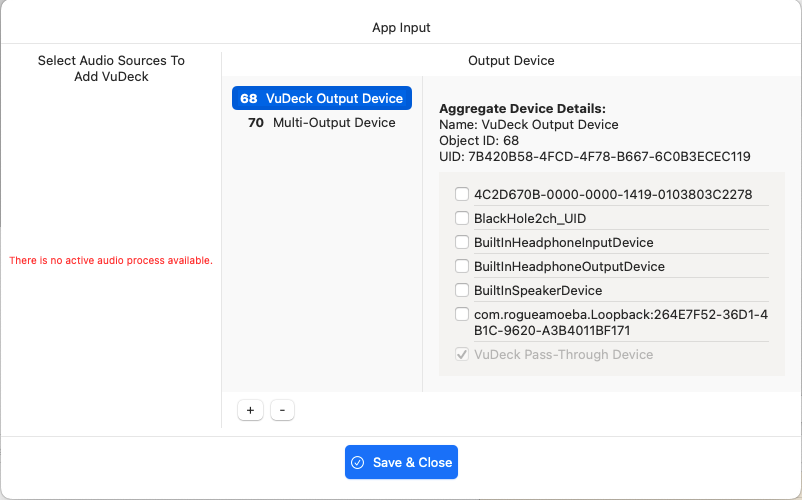
- Go to Settings → Audio Settings, either from the panel or directly from the top menu bar (VuDeck → Audio Settings).
- If there is a Multi-Output Device, you can select and use it. VuDeck will automatically assign the VuDeck Pass-Through Device to the selected device. Alternatively, you can create a VuDeck Output Device and use it as a dedicated device for VuDeck. If no output device has been created previously, the VuDeck Output Device will be automatically created. You need at least one output device created to run the process-based VuDeck setup.
- Make sure to select audio sources from the left pane. Any active app, such as a browser with YouTube open or a music app, will appear.
- Click the Save & Close button. If there are no errors, VuDeck will be ready to use.

If you choose to use a Multi-Output Device, make sure to also assign a physical output device, such as headphones or speakers, if you want to hear the audio.
